DIY Sensory Jars
- Green Bay Area Mom

- Jan 9, 2020
- 3 min read
This post contains affiliate links.
Sensory Jars. Calming Jars. Whatever you want to call them, they are addictive to make, and kids love them! I recently ordered a batch of clear plastic bottles on Amazon and started making some simple sensory jars for my little guy to enjoy. The possibilities are endless for what to fill the bottles with. Check out a few of the easiest sensory jars to make – you likely already have most of the supplies at home!
First, you will need clear plastic bottles. These don’t have to be fancy, and can even be made with recycled water bottles that are washed out. The bottles I used are 13.6oz (or 400mL). I like that the plastic for these bottles is a bit thicker than a recyclable bottle, and they look pretty sleek.
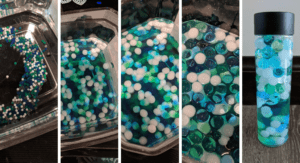
Water Bead Sensory Jars
OK, you probably don’t have water beads sitting around your house. This was the one other thing I had to order. I found ocean colored water beads (affiliate link) on Amazon, and let me tell you: a little goes a LONG WAY. Seriously. 1 Tbsp. of dry water beads filled a medium-sized bowl once fully hydrated.
Follow the instructions on your water beads for how to make them. Mine took roughly 8 hours to fully hydrate. Although the beads I bought technically said “non-toxic,” use extreme caution with these beads, as they can be dangerous, especially if swallowed when dry.
Once the beads are hydrated, fill a plastic bottle to the top, add some extra water to the bottle, and superglue the lid shut.
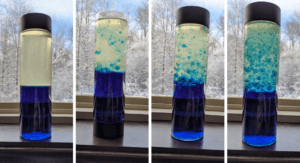
Oil & Water Sensory Jars
This is my FAVORITE! Bonus: It is ridiculously easy to make. All you do is add warm water to the plastic bottle – filling it roughly 1/3 – 1/2 of the way. Then, add several drops of food coloring of your choice, & swish it around. Finally, fill the rest of the bottle with vegetable oil. Glue the lid shut, and prepare to be mesmerized when you give that jar a swirl!
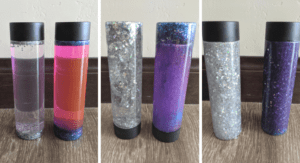
GLITTER Sensory Jars
I don’t know about other crafters, but my craft cupboard is FULL of random jars of glitter. I never know what to use it for, but it is just too pretty to get rid of. Well, this sensory jar is the PERFECT use for it!
Starting with warm water and a couple drops of food coloring in your plastic bottle, add in a hefty helping of glitter. So precise, I know. Next, add some glue. I used white Elmer’s glue (because I had a literal gallon of it on my counter), but I think it would turn out better with the clear glue instead. Adding more glue makes the glitter move around more slowly, so if you like the glitter to flutter more quickly, stick with a higher volume of water! Glue the lid shut, and enjoy!
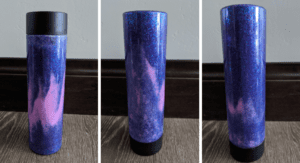
UPDATE:
I don’t care how much white glue I have in my craft cupboard… I made new Glitter Sensory Bottles with CLEAR glue, and they are soooo much cooler. It’s definitely worth a trip to the store to use Clear glue rather than the regular white glue.
**Even with the lids on your sensory jars glued shut, only allow kids to use these bottles under adult supervision.**
Have you made any Sensory Jars? What is your favorite?
Original post by Christie on 1/9/20


Comments